Styling Flask
Learning Objectives
After this lesson, you will be able to:
- Write basic HTML.
- Write basic CSS.
- Style a Flask app.
Customizing Our Flask App
Run your my_website.py. How does it look?
Reminder: http://localhost:5000/
How do we add colors? Styles? Formatting?
We need HTML and CSS.
Pro tip: This is front-end web development!
Talking Points:
- Our
hello worldFlask app is beautiful. But not everyone else knows how to look at it and fully appreciate its beauty. - In this lesson, we're going to focus on HTML.
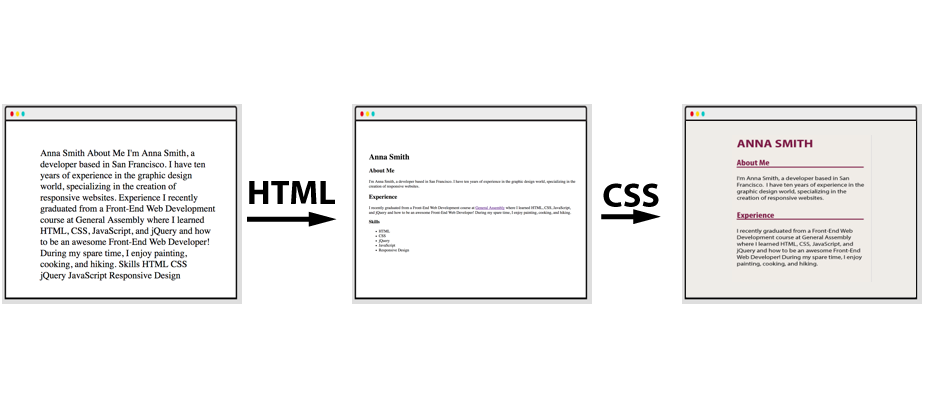
HTML and CSS
HTML: Content, Structure, and Presentation
- Paragraphs
- Headings
CSS: Style and Design
- Colors
- Fonts
Teaching Tip:
- We're going to learn both of these, but point out the difference.
First, HTML
HTML means...
- Hypertext Markup Language
- HTML is not a programming language!
- Adding structure to a webpage. What's a heading? What's a paragraph? What's a list?

Teaching Tip:
- We're going to learn both of these, but point out the difference.
Talking Point:
- HTML is a markup language — we mark up text with it. But we can't write programs with it.
HTML Elements
The fundamental building block of HTML is the element.
<p>Here is a paragraph with p tags. The tags won't appear to the user.</p>
(Most) elements consist of:
An opening tag (
<p>).- Indicates, "Format this content!"
- Defines what TYPE of content it is (e.g., paragraph, header).
Content (e.g., text, images, video, or other elements).
- What the user sees.
A closing tag (
</p>).- Indicates, "The content has ended."
- Has a
/.
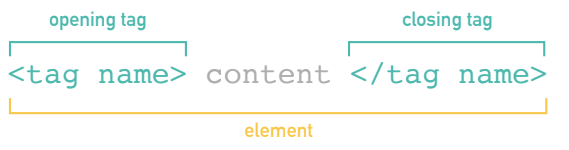
Tags are always in angle brackets.
Teaching Tip:
- Make sure this is clear.
Types of Tags
Different tags apply different formatting.
Paragraphs:
- These will be regular-sized text.

Headings:
- These will be larger and bold text.

Talking Point:
- There is a tag for every piece of content on the website.
Paragraph Tags
These are possibly the most common tags — all websites have paragraphs!
- Used to group related chunks of text.
- Browsers will apply default styling.
- The most universal content tag in HTML.
Teaching Tip:
- Example on the next page.
Paragraph Tags II
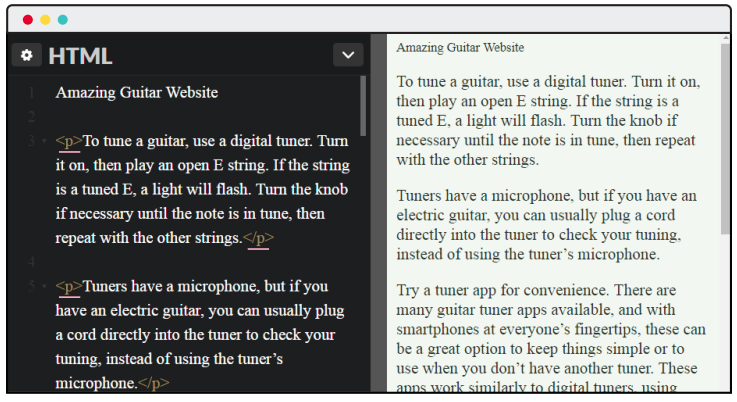
Note: As "Amazing Guitar Website" doesn't have a p tag, it looks different. The browser doesn't yet know how to display it.
Talking Point:
- Note that because "Amazing Guitar Website" doesn't have a tag, it looks different. The browser doesn't think it's a paragraph.
We Do: Paragraph Tags
Add <p> and </p> around the paragraphs.
- You might need to "Change View" to see both the input and output.
Teaching Tip:
- Do this with students. It's the first CodePen they've seen, so walk around and make sure they can all do it.
CodePen has:
Anna Smith

About Me

I'm Anna Smith, a developer based in San Francisco. I have 10 years of experience in the graphic design world, specializing in the creation of responsive websites.

Experience

I recently graduated from a Front-End Web Development course at General Assembly, where I learned HTML, CSS, JavaScript, and jQuery and how to be an awesome front-end web developer! During my spare time, I enjoy painting, cooking, and hiking.
Heading Tags
Teaching Tips:
- Example on the next page.
- Ask what they think headings are.
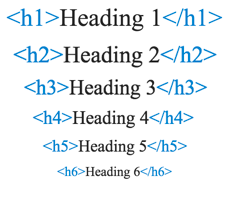
Heading Tags II
- Used to display text as a title/headline of a webpage or webpage section.
- Tags
<h1>through<h6>. <h1>defines the most important title on the page.- Note that we didn't do anything — browsers just know headings are bigger!

Talking Point:
- These play a role in search engine optimization (SEO); search engines pay special attention to what is in these tags.
Heading Tag Sizing
Teaching Tips:
- Consider opening a CodePen (the previous one works) and demonstrating each of these.
You Do: Heading Tags
- Put
<p>around the paragraphs. - Put
<h1>aroundAnna Smith. - Put
<h2>aroundAbout Me. - Put
<h3>aroundExperience.
Teaching Tip:
- Have students do this. See if they can all do it before doing it for them.
CodePen has:
Anna Smith

About Me

I'm Anna Smith, a developer based in San Francisco. I have 10 years of experience in the graphic design world, specializing in the creation of responsive websites.

Experience

I recently graduated from a Front-End Web Development course at General Assembly, where I learned HTML, CSS, JavaScript, and jQuery and how to be an awesome front-end web developer! During my spare time, I enjoy painting, cooking, and hiking.
Heading Tags Solution
What About Lists?
There are two types of lists:
- Unordered lists.
- Ordered lists (aka, numbered lists).
Teaching Tip:
- Ask students if they think these are made the same way.
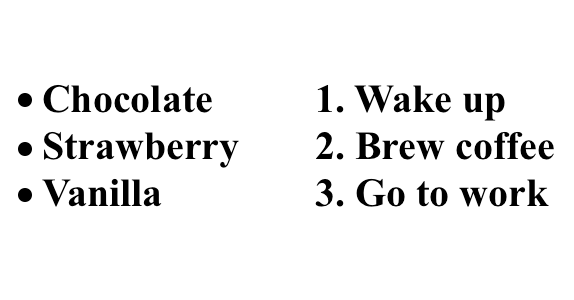
The List Tag
<ul></ul>defines an unordered list.Used together with list item:
<li></li>.
<ul>
  <li>Chocolate</li>
  <li>Strawberry</li>
  <li>Vanilla</li>
</ul>
- Notice the indent — just like Python!
Teaching Tips:
- Ask students why they think it's indented.
- Why do they think there are two tags here?
Ordered Lists
<ol></ol>defines an ordered list.List item is the same:
<li></li>.
<ol>
  <li>Wake up</li>
  <li>Brew coffee</li>
  <li>Go to work</li>
</ol>
Teaching Tip:
- Note that
ois for ordered list anduis for unordered list.
You Do: Lists
- Set "Skills" to be an
h3. - Create an unordered list.
- Then create an ordered list!
Teaching Tip:
- Have students do this. See if they can all do it before doing it for them.
CodePen has: The same text as earlier.
Lists Solution
Quick Review
We've talked about HTML tags.
- They add structure to a page.
- Browsers automatically size paragraphs and headings appropriately.
- Lists are automatically given bullets or numbers.
All HTML is formed with tags:
Teaching Tip::
- Do a quick check for understanding.
We Do: Defining HTML
- Open any webpage.
- Right click.
- Click "View Page Source."
Teaching Tips:
- Do this with them!
- Keep the webpage source open on the screen for students to follow down as you dive into the
html,header, andbodytags.
HTML Structure: doctype
<!DOCTYPE html>
Short for "document type declaration."
ALWAYS the first line of your HTML.
Tells the browser we're using HTML5 (the latest version).
Note: The CodePen did this automatically for us. It did a lot!
Teaching Tip:
- Stress that this has to be there.
HTML Structure: <html>
<html> is the tag for HTML content!
- All HTML should be contained inside
<html></html>. - Represents the root of your HTML document.
Within our <html> tags, we have:
<head></head><body></body>
<!DOCTYPE html>
<html>
  <head>
  </head>
  <body>
  </body>
</html>
Teaching Tip:
- Stress that this has to be there and that this is the structure of every page.
HTML Structure: <head>
<head>: The first tag inside<html></html>.- Adds additional, behind-the-scenes content.
- Is not displayed, but is machine-parsable.
<!DOCTYPE html>
<html>
  <head>
    < BEHIND THE SCENES HERE! >
    <title>< PAGE TITLE > </title>
   <meta charset="utf-8">
  </head>
  <body>
  </body>
</html>
Teaching Tip:
- You'll need to explain
charset. Don't spend a lot of time on this — it really isn't important to them.
HTML Structure: <body>
<body>: The second tag inside<html></html>.- Follows
<head></head>. - Contains HTML/content that will be displayed to the user.
- All other HTML will be placed here.
- Follows
<!DOCTYPE html>
<html>
  <head>
    <title>Website Title</title>
   <meta charset="utf-8">
  </head>
  <body>
    <h1>ALL HTML CONTENT GOES HERE!</h1>
    <p>Here's a paragraph with the p tag — this will actually get displayed.</p>
    <h4>Put whatever you want the user to see here!</h4>
  </body>
</html>
Teaching Tip:
- Note that this is what students will really care about.
We Do: Create an HTML Doc
- Create a directory called
html_practice. - Create a file called
index.html.
Put this content:
<!DOCTYPE html>
<html>
  <head>
    <title>Website Title</title>
   <meta charset="utf-8">
  </head>
  <body>
    <h1>ALL HTML CONTENT GOES HERE!</h1>
  </body>
</html>
Double click your file to open it in a browser!
Teaching Tip:
- Check that students have done this and understand.
You Do: Create a Profile
Using the tags below, create a profile for yourself in your index.html.
Include: Name, About Me, and Hobbies.
Put all your HTML and content in between the <body> and </body> tags.
Common tags you might want to use:
- Paragraph:
<p>paragraph</p> - Heading:
<h1>Welcome!</h1> - Lists:
- Unordered (
<ul>Things I like</ul>) - Ordered (
<ol>1, 2, 3!</ol>) - List items (
<li> </li>)
- Unordered (
- Bonus: Use bold (
<b>bold</b>).
Teaching Tips:
- Note that students can load this in a browser to see it update.
- Check that they've done this and understand.
- They don't need to be HTML experts! They just need to read and write basic tags.
- Encourage students to experiment with the tags.
Example Solution
<!DOCTYPE html>
<html>
  <head>
    <title>About Me!</title>
   <meta charset="utf-8">
  </head>
  <body>
    <h1>Welcome!</h1>
    <p><b>I'm Sonyl and welcome to my profile!</b></p>

    <p>Things I Like:</p>
    <ul>
      <li>Animals</li>
      <li>Food</li>
      <li>Sleep</li>
    </ul>

    <p>My Daily Routine:</p>
    <ol>
      <li>Wake up</li>
      <li>Drink coffee</li>
      <li>Write great code!</li>
      <li>Go to sleep</li>
    </ol>
  </body>
</html>
Quick Recap
An HTML file looks like this:
<!DOCTYPE html>
<html>
  <head>
    <title>Website Title</title>
   <meta charset="utf-8">
  </head>
  <body>
    < Everything the user sees goes here. >
  </body>
</html>
This is the file your browser gets for any webpage you visit, like Google.com!
Teaching Tips:
- Do a quick check for understanding.
- Encourage students to look up any tags they need to — this isn't an HTML and CSS course. We're giving them enough to style their Flask app, and they can look further into the topics later.
Some Tags Need Attributes: Links
What about… a hyperlink that we want to click and go to another URL?

We need to tell the browser where the hyperlink should go.
<a href="Where does this link go?">Clickable text</a>
<a href="https://google.com">Click here for Google.</a>
We Do: Add a link to Google in your HTML. Reload!
Teaching Tip:
- Do this with the students. Be sure they understand.
Some Tags Need Attributes: Images
<img>: A picture!- But what picture? We need to tell the browser. The image needs a source:
src.
<img src='https://media.giphy.com/media/sWrDT2OqxJ3Fu/giphy.gif'>
- Images are special — they have no closing tag!
We Do: Add this image in your HTML. Reload!
Teaching Tip:
- Do this with the students. Be sure they understand.
Quick Recap II
Some tags need more information: Where is the link going? What is the image? Give the browser whatever it needs to know.
Don't memorize these!
- There are hundreds of tags.
- You can always:
- Ask a friend.
- Ask me!
- Google "HTML" + what you want to do.
- E.g., "HTML image"
Up next: CSS!
Teaching Tip:
- Do a quick check for understanding.
Styling: CSS
Let's switch gears. We have a structured website.
How do we style it?
Teaching Tip:
- Do a quick check for readiness to move on.
CSS
CSS means…
- Cascading Style Sheets.
- Styling your HTML (e.g., colors, fonts, text sizes).
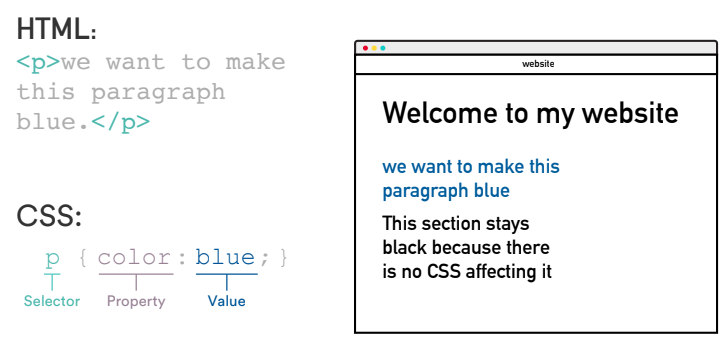
CSS tags match HTML tags.
- This rule turns everything with a paragraph tag (
<p>) blue.
Teaching Tip:
- Walk through the syntax here.
CSS Color Property
You can set text color with color:
p {
  color: red;
}
Color values can be specified using:
- Color keyword (e.g.,
red). - Hex code (e.g.,
#FF0000).- The common way to set colors!
- Color-pickers online give you the code.
Teaching Tips:
- Again, walk through the syntax.
- Note that we are not going in detail about colors or CSS options. This is just so students know this exists.
We Do: CSS Color
In the CSS window, add:
p {
  color: blue;
}
Teaching Tip:
- Do this with the students. Make sure they do it.
CodePen note:
<h1>Anna Smith</h1>

<h2>About Me</h2>

<p>I'm Anna Smith, a developer based in San Francisco. I have 10 years of experience in the graphic design world, specializing in the creation of responsive websites.</p>

<h2>Experience</h2>

<p>I recently graduated from a Front-End Web Development course at General Assembly, where I learned HTML, CSS, JavaScript, and jQuery and how to be an awesome front-end web developer! During my spare time, I enjoy painting, cooking, and hiking.</p>

<h3>Skills</h3>

<ul>
  <li>HTML</li>
  <li>CSS</li>
  <li>jQuery</li>
  <li>JavaScript</li>
  <li>Responsive design</li>
</ul>
CSS: Syntax (CTN)
CSS font size:
- Sets the size of the font.
- We'll use pixel values (e.g.,
12px,16px).
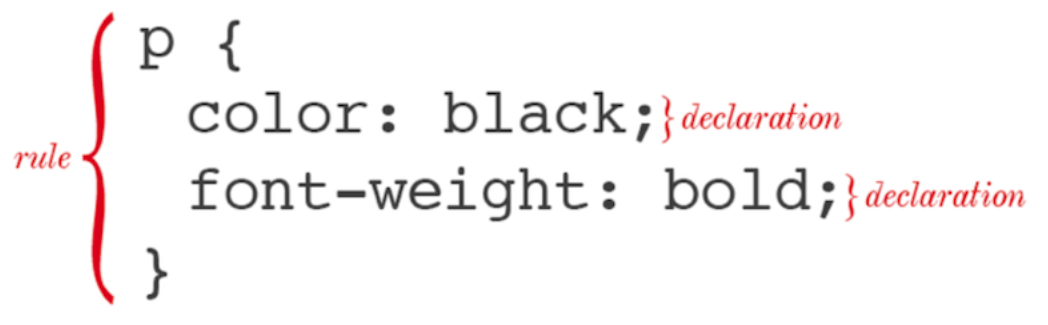
Fun facts:
- One selector can have multiple declarations.
- It's common for each declaration to have its own line.
Teaching Tip:
- Walk through the syntax here.
You Do: CSS
In the CSS window, add:
p {
  color: blue;
  font-size: 12px;
}
Teaching Tip:
- Show students after they've all done it.
CodePen note:
<h1>Anna Smith</h1>

<h2>About Me</h2>

<p>I'm Anna Smith, a developer based in San Francisco.  I have 10 years of experience in the graphic design world, specializing in the creation of responsive websites.</p>

<h2>Experience</h2>

<p>I recently graduated from a Front-End Web Development course at General Assembly, where I learned HTML, CSS, JavaScript, and jQuery and how to be an awesome front-end web developer! During my spare time, I enjoy painting, cooking, and hiking.</p>

<h3>Skills</h3>

<ul>
  <li>HTML</li>
  <li>CSS</li>
  <li>jQuery</li>
  <li>JavaScript</li>
  <li>Responsive design</li>
</ul>
Quick Review III
We can now style elements. We can style any element with a tag!
p {
  color: blue;
  font-size: 12px;
}
body {
  color: yellow;
}
Teaching Tip:
- Do a quick check for understanding.
Adding CSS to HTML
We have CSS. We need to tell the HTML about it! CodePen's been doing this for us.
- Like
<title>, placed within<head>— it's something for the HTML to see, but not the user.
<!DOCTYPE html>
 <html>
 <head>
   <title>Super Awesome Website</title>
    <link rel="stylesheet" type="text/css" href="style.css">
 </head>
 <body>
rel- Specifies the relationship between the current document and the linked document.
type- Specifies the media type of the linked document.
href- Specifies the location of the linked document.
Teaching Tip:
- Check for understanding.
We Do: HTML With CSS
Let's do this.
In the directory with your
index.html, createstyles.css.In it, put:
p {
  color: blue;
  font-size: 12px;
}
body {
  background: yellow;
}
Save and reload!
Teaching Tip:
- Do this with them. Be sure they understand.
Quick Recap: HTML and CSS
HTML structures the page; CSS styles it. The CSS tags match the HTML tags.
We put CSS in a separate file and link it to the HTML.
p {
  color: blue;
}
<!DOCTYPE html>
 <html>
 <head>
   <title>Super Awesome Website</title>
    <link rel="stylesheet" type="text/css" href="style.css">
 </head>
 <body>
    <p>Here's a paragraph the user will see — it will be blue!</p>
  </body>
</html>
This is a crash course. It's a huge topic! We just need the basics.
Up next: How do we do this with Flask?
Teaching Tip:
- Do a quick check for understanding.
We Do: Adding HTML and CSS to Flask
Run your my_website.py — how does it look right now? Probably not the best…
Reminder: http://localhost:5000/
from flask import Flask
app = Flask(__name__)

@app.route('/')
def hello_world():
    return 'Hello, World!'

if __name__ == '__main__':
    app.run(debug=True)
Flask automatically makes the page structure for us — the html, head, body, doctype, etc.
Discussion: Where does that "return" go? Where could we put our HTML?
Teaching Tip:
- Run through this code again to remind students what it does.
We Do: Add Some HTML
Flask can have in-line styling and HTML right in the return!
- Inside the quotes. The
returnis what goes inside thebodytag of the HTML.
Try this:
- Add italic tags around "Hello".
- Make the whole string an
h1.
def hello_world():
    # Here,
    # Add
    return '<h1><i>Hello</i>, World!<h1>'
What if we have a LOT of HTML?
Teaching Tips:
- Do this with the students. Show them the results! Make sure they understand how the webpage is generated.
- Note to them that as they save the Python file, the app will automatically reload (though it's a bit slow). They don't have to continuously start and stop from the command line.
- Encourage discussion on each slide to try and get them to guess the next one.
We Do: Add a LOT of HTML
Copy this code over:
def hello_world():
    line1 = "<h1><b>Hello</b> World!</h1>"
    line2 = "<p>If music be the food of love, play on!</p>"
    line3 = "<img src='https://media.giphy.com/media/sWrDT2OqxJ3Fu/giphy.gif'>"
    total = line1 + line2 + line3
    return total
Do you think chaining lists is sustainable for a bigger webpage?
Teaching Tip:
- Do this with the students. Show them the results! Make sure they understand how the webpage is generated.
Quick Recap IV
Flask automatically makes a basic webpage for us. The HTML looks like this:
<!DOCTYPE html>
 <html>
 <head>
   <title>Super Flask Website</title>
 </head>
 <body>
    < What we return in Flask goes here! >
  </body>
</html>
Flask does that automatically — we just need to write the Python code for the body.
Up next: But what if we have a ton of code?
Teaching Tip:
- Do a quick check for understanding.
We Do: External HTML File
Create a folder called templates.
- Flask always looks in a
templatesdirectory for HTML files.
Create a file called index.html with some HTML:
<!doctype html>
<html>
<head>
    <meta charset="utf-8">
    <title>Movie Search</title>
</head>
<body>
    <p>Howdy!</p>
</body>
</html>
Teaching Tips:
- Do this with the students.
- It's just normal HTML!
- Try not to mention templates — those aren't for a few presentations.
We Do: Tell Flask the HTML Exists
How do we import an HTML file?
render.template.
At the top of your file, add:
from flask import Flask, render_template
In the .py, change your return to return render_template("index.html").
- Save the lines you have! Just change the return.
Try it!
Teaching Tip:
- Do this with the students. Show them! Check that they understand.
Possible Current Status of Code:
from flask import Flask, render_template
app = Flask(__name__)

@app.route('/')
def hello_world():
    line1 = "<h1><b>Hello</b> World!</h1>"
    line2 = "<p>If music be the food of love, play on!</p>"
    line3 = "<img src='https://media.giphy.com/media/sWrDT2OqxJ3Fu/giphy.gif'>"
    total = line1 + line2 + line3
    return render_template("index.html")
if __name__ == '__main__':
    app.run(debug=True)
We Do: Expanding the HTML
Now all our lines can go in the HTML:
<body>
    <h1><b>Hello</b> World!</h1>

    <p>If music be the food of love, play on!</p>

    <img src='https://media.giphy.com/media/sWrDT2OqxJ3Fu/giphy.gif'>
</body>
Try it!
Teaching Tip:
- Do this with the students. Show them! Check that they understand.
V
Flask automatically generates the webpage HTML and puts your HTML in the body tag — whatever you put in your return statement.
If your HTML gets to be too long to put in just a function without being confusing, you can make the HTML file yourself and tell Flask to load that.
Teaching Tip:
- Do a quick check for understanding.
We Do: Adding CSS
templates folder:
- Where Flask looks for HTML files.
static folder:
- Where Flask looks for CSS files.
We Do: Adding CSS II
Create a static folder with a file, style.css.
Your directory should look like:
project_folder
│
│   │   my_website.py
│   │
│   │
│   └───templates
│   │    └─── index.html
│   │
│   │
│   └───static
│       └───style.css
Teaching Tip:
- Do this with the students; make sure they've done it.
We Do: Background Color
Add this to style.css:
body{
  background: #FEDCBA;
  font-family: "Times New Roman", serif.
}

h1 {
  color: #012345;
}
What does it do? Reload your page!
What do you think happened?
Teaching Tips:
- Do this with them.
- See if they can guess why it didn't appear.
We Do: Importing the CSS
We have:
- HTML.
- CSS.
Flask knows about:
- The HTML.
What knows about the CSS?
What should know about the CSS? How can we do that?
Teaching Tip:
- Encourage a discussion.
We Do: Putting CSS in the HTML
CSS styles HTML docs. We know that!
As we saw earlier, the HTML doc needs to have the CSS link!
In the HTML head, we need to have:
<link rel="stylesheet" href="{{ url_for('static', filename='style.css')}}">
The curly braces {{ }} call Flask!
- "Flask, find
style.cssinstatic."
We Do: Modify your index.html's <head>. Reload your page!
Teaching Tips:
- Explain the curly braces!
- Do this with the students. Make sure they can do it.
Quick Recap V
HTML structures pages. We can make a separate HTML file that Flask calls to load, in a templates folder.
CSS styles pages. We can make a separate CSS file in a static folder.
We have to tell the HTML file about the CSS file.
Flask calls the HTML file, which calls the CSS file.
Teaching Tip:
- Do a quick check for understanding.
You Do: Customize Your Page
Modify your HTML and CSS files. Here are some ideas:
- Try changing the colors in your CSS file.
- Use
text-aligntocenterthe content. - Use
text-decorationtounderlinetheh1. - Use other HTML tags! Can you make a hyperlink using
<a href="<url>">Click here </a>? - Can you add a list using
<ul><li></li></ul>?
5-10 MINUTES
Teaching Tips:
- Give students time to do it; walk around the room.
- See if anyone wants to share.
Example HTML
<!doctype html>
<html>
<head>
    <meta charset="utf-8">
    <title>Movie Search</title>
    <link rel="stylesheet" href="{{ url_for('static', filename='style.css')}}">
</head>
<body>
    <h1><b>Hello</b> World!</h1>

    <p><a href="http://www.shakespeare-online.com/plays/twn_1_1.html">If music be the food of love, play on!</a></p>

    <ul>
      <li>Give me excess of it, that, surfeiting,</li>
      <li>The appetite may sicken, and so die.</li>
      <li>That strain again! it had a dying fall:</li>
      <li>O, it came o'er my ear like the sweet south,</li>
      <li>That breathes upon a bank of violets,</li>
      <li>Stealing and giving odour! Enough; no more:</li>
      <li>'Tis not so sweet now as it was before.</li>
      <li>O spirit of love! how quick and fresh art thou,</li>
      <li>That, notwithstanding thy capacity</li>
      <li>Receiveth as the sea, nought enters there,</li>
      <li>Of what validity and pitch soe'er,</li>
      <li>But falls into abatement and low price,</li>
      <li>Even in a minute: so full of shapes is fancy</li>
      <li>That it alone is high fantastical.</li>
    </ul>

    <img src='https://media.giphy.com/media/sWrDT2OqxJ3Fu/giphy.gif'>
</body>
</html>
Example CSS
body {
  background: #FEDCBA;
  font-family: "Times New Roman", serif.
}

h1 {
  color: #012345;
  text-decoration: underline;
  text-align: center;
}
Summary
HTML:
- Structures pages with headings, paragraphs, lists, etc.
CSS:
- Styles pages! E.g., colors, bold, underline, font size.
Adding HTML and CSS to Flask:
- Use the
templateand thestaticfolders.
- Use the
Teaching Tip:
- Check for understanding; explain next steps.